Hope you like this combo! I do.
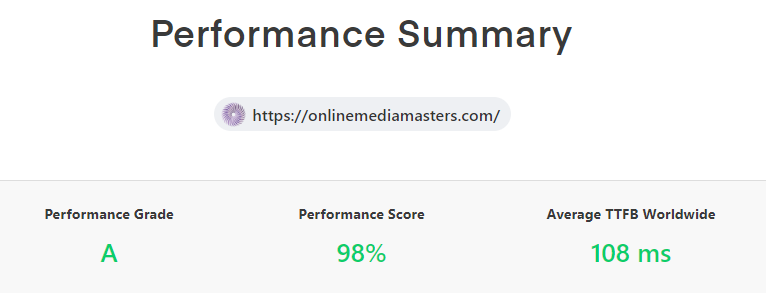
I was previously using Cloudways Vultr HF + Cloudflare Enterprise + WP Rocket + Perfmatters. However, Cloudways still doesn’t have full page caching on Cloudflare Enterprise which is why your TTFB may not be “as fast as you want” when testing your site in SpeedVitals and KeyCDN. Hosting/CDN are the 2 main TTFB factors which is 40% of LCP. Rocket.net with their Cloudflare Enterprise averages around a <100ms TTFB (you can test my site). For them, I just requested a migration, used PHP 8.1, and asked support to install Redis. Cloudflare Enterprise is automatic. You can delete your image optimization/security plugin which add bloat. I don’t know why Cloudflare Polish doesn’t want to serve images in WebP, so I manually converted many of them.
FlyingPress was a big upgrade over WP Rocket (originally recommended to me by WP Johnny who even set it up). Curious on why FlyingPress was so much faster, I made a comparison table. IMO, WP Rocket has fallen behind core web vitals and only released 1 new feature after 2020 if you check their changelog. FlyingPress also has a Facebook Group which has a lot of answers. I already wrote a guide on it, so I’ll mainly focus on how it overlaps with Rocket.net + FlyingPress.
I only use Perfmatters for the script manager (which reduces CSS/JS by disabling plugins on pages they’re not used). The general settings (which takes care of optimizations not found in FlyingPress like junk removal, limiting heartbeat + post revisions, increasing autosave interval, and moving wp-login). Preloading gives you more control of resources hints (I just preloaded wp-block-library since I use Gutenberg). If you use Google Analytics, enable local analytics and use a smaller script type while disabling remarketing features if you don’t need certain GA data.
To benchmark before & after results, I like SpeedVitals, WordPress Hosting Benchmark, and Search Consle’s core web vitals report. Here are my affiliates links to Rocket.net, FlyingPress, and Perfmatters. I won’t use them anywhere else in this tutorial. Thank you, I do appreciate it.
1. Configure Rocket.net
Request A Free Migration – if you haven’t tried them, you can get your first month for $1, then request a free migration in their dashboard (called Mission Control). They did mine in <2 hours.
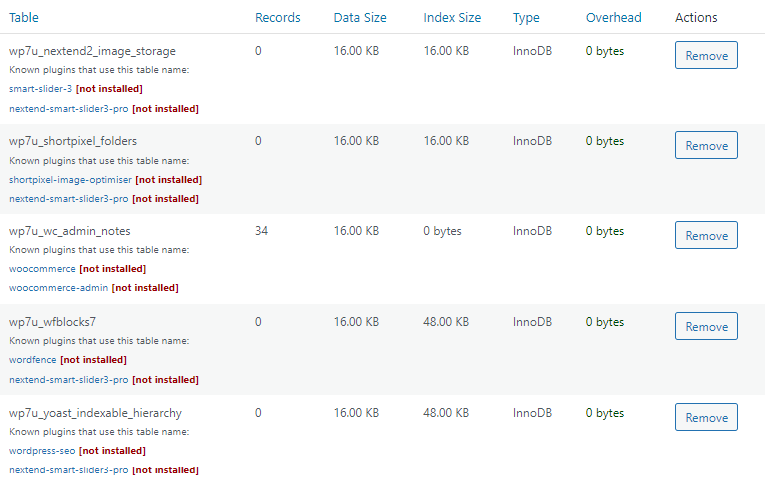
Update PHP Version + Configure Auto Updates – I use PHP 8.1 and enabled auto updates for WordPress core and theme (only because I use GeneratePress which has reliable developers), but I don’t auto update plugins which are more likely to cause errors. phpMyAdmin is great for thorough database cleanups – otherwise WP-Optimize has more DB settings than FlyingPress.
Ask Support To Install Redis – WooCommerce/dynamic sites should definitely use Redis and Ben also wrote a post about it. Rocket.net’s Enterprise hosting includes Redis Object Cache Pro.
Remove Image Optimization + Security Plugins – Cloudflare Enterprise uses Mirage/Polish to optimize images, so you shouldn’t need a plugin. It also uses WAF and other security features, so delete your security plugin. Just use strong passwords, move wp-login (in Perfmatters), and limit login attempts if you need to. Many of these plugins add bloat and increase memory usage.
Images Aren’t Served In WebP – Cloudflare Polish is supposed to serve images in WebP. However, I noticed none of my images used WebP. You can check the Network tab of Chrome Dev Tools to see whether yours are. Cloudflare doesn’t always use WebP images when the savings aren’t high enough, but I never saw images served in WebP. However, when I used a PNG to WebP converter and uploaded them manually, the size often went from about 40kBs to 10kBs. My “workaround” is that I converted several above the fold images to WebP since those are most important for LCP. It’s a pain, but it did cut my page size down significantly. You can also try a WebP plugin like Converter For Media or WebP Express, but I haven’t tried these yet. For now, my only WebP images are the ones I manually converted for above the fold images.
CDN URL – you don’t need to add Rocket.net’s CDN URL to FlyingPress or Perfmatters since Cloudflare Enterprise is setup via Rocket.net. Many of you asked and I confirmed this with Ben.
2. Configure FlyingPress
FlyingPress takes care of most core web vital optimizations outside of hosting/CDN. I’ve also seen several people (including me) report it does a much better job optimizing for real-world browser speed compared to WP Rocket. I have a settings tutorial, but here are the settings I use.
Dashboard
FlyingPress v4 will have additional preload/purge settings which Gijo announced.
Cache
- Cache Pages: On – page caching is a different layer than Cloudflare’s cache. Ben also confirmed you should keep it on in case the cache is stale on the edge. To make sure FlyingPress’ cache is working, use uptrends.com to look for x-flying-press-cache: HIT.
- Additional Auto Purge: None – unless you have dynamic content FlyingPress can’t detect, leave as none. Otherwise, purging too many things increases memory usage.
- Cache Lifespan: Never – recommended in the documentation and also what I use.
- Exclude Pages from Caching: most important pages will be excluded automatically.
- Optimize for Logged in Users: Off – speeds up admin but you may see old content.
CSS
- Minify & Optimize CSS Files: On – since FlyingPress does a good job optimizing CSS/JS, use their CSS/JS settings, then disable them in Perfmatters. The only time I would use Perfmatters for these is when using plugins like SG Optimizer which lack CSS/JS settings.
- Generate Critical and Used CSS: On – remove is fastest, but test this since it can break your site. It did for mine, so I use asynchronously which the documentation says is safest.
- Force Include Selectors: if CSS files aren’t being included in critical CSS, add their CSS selectors here. Gijo gives the example of #cookie-notice, but check your site’s selectors.
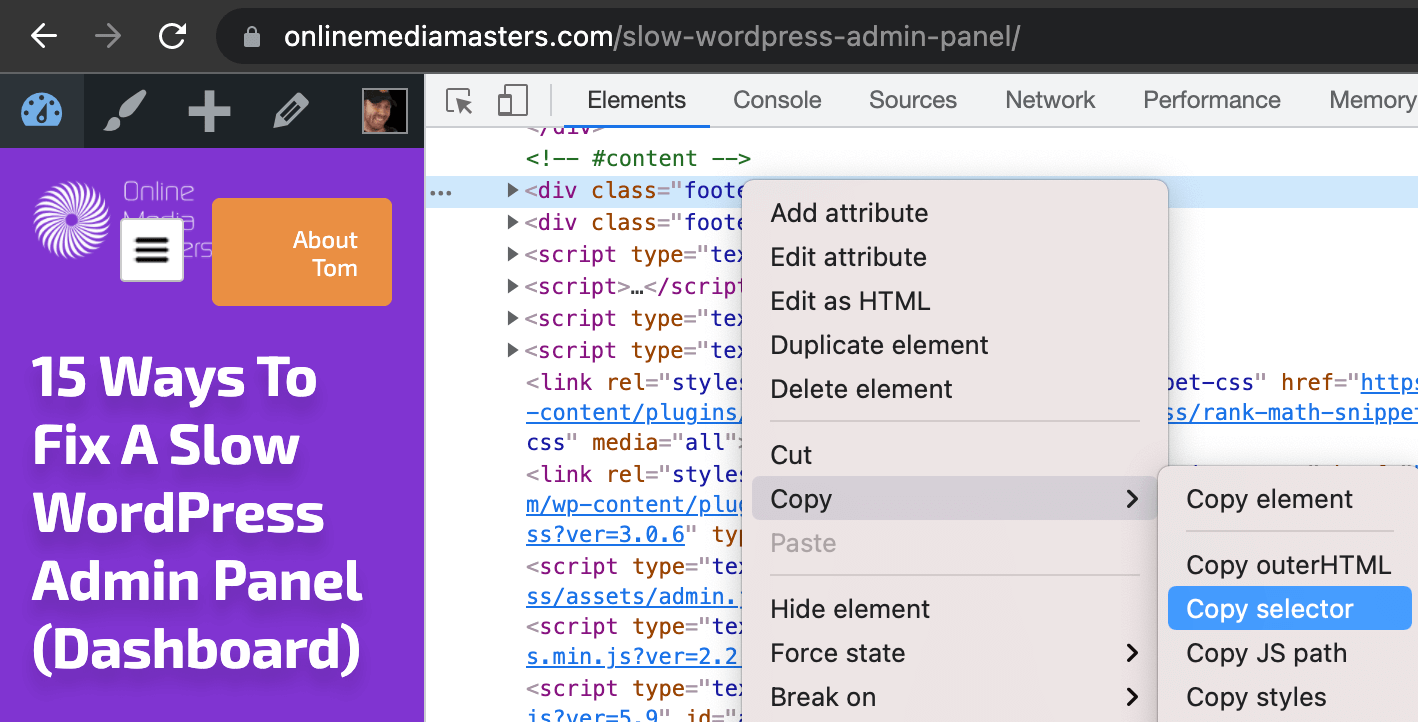
- Lazy Render HTML Elements – lazy loading comments (#comments) and (#footer) can improve LCP/TBT. Inspect your site in Chrome Dev Tools (right click your site → Insect). Now find the element you want to lazy load, then right click → Copy → Copy Selector. Finally, paste it in FyingPress (see 1:08 in the video) and that element will be lazy loaded.
JavaScript
- Minify JavaScript: On – again, use FlyingPress to optimize JavaScript (not Perfmatters).
- Preload Links: On – you would normally disable this on shared hosting since it increases CPU usage if users hover over lots of pages, causing them to download in the background. But Rocket.net can handle it. It won’t improve scores, but improves real-world browsing.
- Defer JavaScript: Off – can fix render-blocking resource errors in PageSpeed, but WP Johnny recommends leaving it off since it can make your site slower. Test your results. If enabled, I suggest also enabling Defer Inline JavaScript, especially for WooCommerce.
- Load Scripts on User Interaction – try delaying plugins loading below the fold (wp-content/plugins/plugin-name) and third-party code found in your PageSpeed report (Google Analytics, Tag Manager, reCAPTCHA, AdSense, etc). While the list below can be used as a baseline, customize to which plugins + third-party code are loading on your site.
Font
- Optimize Google Fonts:
- Display Fallback Fonts: On – adds font-display: swap to external fonts which can fix “ensure text remains visible during webfont load” errors in PageSpeed and improve CLS.
- Preload Fonts: On – find which font files load above the fold or are mentioned in CSS, then preload them here.
Image
- Lazy Load Images:
- Add Responsive Images: Off – only used for FlyingCDN which resizes images for mobile, but Cloudflare already does this with their image resizing.
- Add Width And Height Attributes: On – can fix “use explicit weight and height” in PSI.
- Preload Critical Images: On – automatically detects viewport images and preloads them while excluding them from lazy load, improving LCP (nice feature not found in WP Rocket).
- Disable Emoji: On – removes a small JavaScript code in WordPress that displays emojis.
IFrame
- Lazy Load iFrames: On – lazy loads iFrames like embedded videos and Google Maps.
- Use Placeholder Image for YouTube iFrames: On – loads when play button is clicked.
- Self-host YouTube Placeholder: On – eliminates external requests from i.ytimg.com by downloading the placeholder image to your server (the only plugin I know that does this).
CDN
Leave everything off. There’s no need to add Rocket.net’s CDN URL since like I mentioned, Cloudflare Enterprise is setup automatically. Ben also confirmed you don’t need to add it.
Database
I use WP-Optimize instead which can take backups via UpdraftPlus, save a certain amount of post revisions (instead of deleting them all), and can remove tables left behind by old plugins.
3. Configure Perfmatters
General
- Disable Emojis: OFF – already done by FlyingPress.
- Disable Dashicons: ON – prevents admin icon font from loading on the frontend.
- Disable Embeds: ON – when you paste a URL into your WordPress editor, this feature loads a pretty preview (from YouTube, Facebook, Tweets, etc). Disable if you don’t use it.
- Disable XML-RPC: ON – bad for speed + security (used to publish content from mobile).
- Remove jQuery Migrate: ON – leave on if you’re using a page builder, disable otherwise.
- Hide WP Version: ON – improves security by hiding WP version from showing publicly.
- Remove wlwmanifest Link: ON – you likely don’t use Windows Live Writer, so disable.
- Remove RSD Link: ON – used to edit your site in a browser instead of blog clients.
- Remove Shortlink: ON – disable if you’re using the “post name” permalink structure.
- Disable RSS Feeds: OFF – only enable this if you don’t have a blog on your website.
- Remove RSS Feed Links: ON – removes unnecessary links in your RSS feed to pages, posts, comments, categories, tags, etc. This will remove a little unused code on your site.
- Disable Self Pingbacks:- ON – disables pingbacks when linking to your own blog.
- Disable REST API: disable for non-admins – hides usernames of anyone who published on your site to improve security, but completely disabling it often leads to errors with Gutenberg and certain plugins. Therefore, disabling Rest API for non-admins is safest.
- Remove REST API Links: ON – removes a short line of code created by the REST API.
- Disable Google Maps: OFF – some themes/plugins have the Google Maps API built-in with no option to disable this, in which case you can disable Maps if you don’t use them.
- Disable Password Strength Meter: ON – removes a file that can sometimes load on your website when it should usually only load on account, checkout, and password reset pages.
- Disable Comments: OFF – you probably don’t want to disable your blog comments.
- Remove Comment URLs: ON – disables comment author links which are often spam.
- Add Blank Favicon: OFF – only used for speed testing purposes on fresh WP installs.
- Remove Global Styles: ON – removes 311 lines of unminified code which seemed to be added by mistake to WordPress core. It was originally added to improve duotone styles.
- Heartbeat: only allow when editing posts/pages – recommended by Perfmatters. This disables Heartbeat unless you’re editing content, then set the Heartbeat Frequency to 60s. This reduces Heartbeat requests and reduces CPU usage, but enables only when needed.
- Limit Post Revisions: 5 – gives you a few backups of old posts in case you need to restore a post to an earlier version, but prevents too many revisions from bloating your database.
- Autosave Interval: 5 minutes – increase frequency to reduce CPU and save resources.
- Change Login URL: add a custom login URL – stops unwanted requests by hiding wp-login from bots/attackers. If using QUIC, keep the default URL since it has features to protect it. You can also change the redirect/message when the default login is viewed.
Assets
- Script Manager: ON – enable the script manager, head to your script manager settings, then enable test mode and display dependencies. Test mode lets you test unloading plugins without breaking your site by only showing changes to logged-in admins (just remember to deactivate it when you’re done). Display dependencies lets you see plugins that rely on jQuery which can often be a bottleneck if you look at your Chrome Dev Tools coverage report. Next, use the script manager to disable plugins or individual CSS/JS files where they’re not being used. And if you’re not using Gutenberg, disable wp-block-library.
- All Other Settings: OFF – FlyingPress already delays/defers JS and removes unused CSS.
Preloading
- Enable Instant Page: OFF – same thing as link preloading in FlyingPress.
- Preload: FlyingPress already preloads images/fonts, so only use this if you have other critical resources, like wp-block-library (if you use Gutenberg) and other scripts/styles.
- Preload Critical Images: 0 (Default) – FlyingPress already does this.
- Preconnect – CDN URLs and third-party fonts are usually the only URLs you should preconnect. But since fonts should be hosted locally and Ben says you don’t need to preconnect the CDN URL, leave this blank.
- Prefetch – usually blank since third-party domains should be hosted locally or delayed.
Lazy Loading
Fonts
CDN
Analytics
- Enable Local Analytics: ON – if you’re using Google Analytics, this host is locally once you
- Tracking ID: enter your Google Analytics tracking ID so it can be hosted locally.
- Tracking Code Position: Header (Default) is what’s recommended by Google.
- Script Type: analytics.js or minimal – these have smaller file sizes compared to other types, but disables some data in Google Analytics. Read the Perfmatters documentation and decide whether you want to disable the data in return for a small performance boost.
- Disable Display Features: ON – disables remarketing and advertising options in GA which isn’t used by most people and prevents a second HTTP request to DoubleClick.
- Anonymize IP: ON – shortens IP address to comply with GDPR in some countries.
- Track Logged In Admins: OFF – you don’t want admin visits in your analytics data.
- Adjusted Bounce Rate: 30 – if visitors stay for longer than 30 seconds, they won’t be considered a bounce. This is recommended by Perfmatters and is on a scale from 1-100.
- Use MonsterInsights: OFF – only enable if using MonsterInsights to host GA locally.
- Enable AMP Support: : OFF – only enable if you’re using AMP which I don’t recommend.
Database
Use WP-Optimize instead which has more settings and can take backups + remove tables.
4. Benchmarking Results
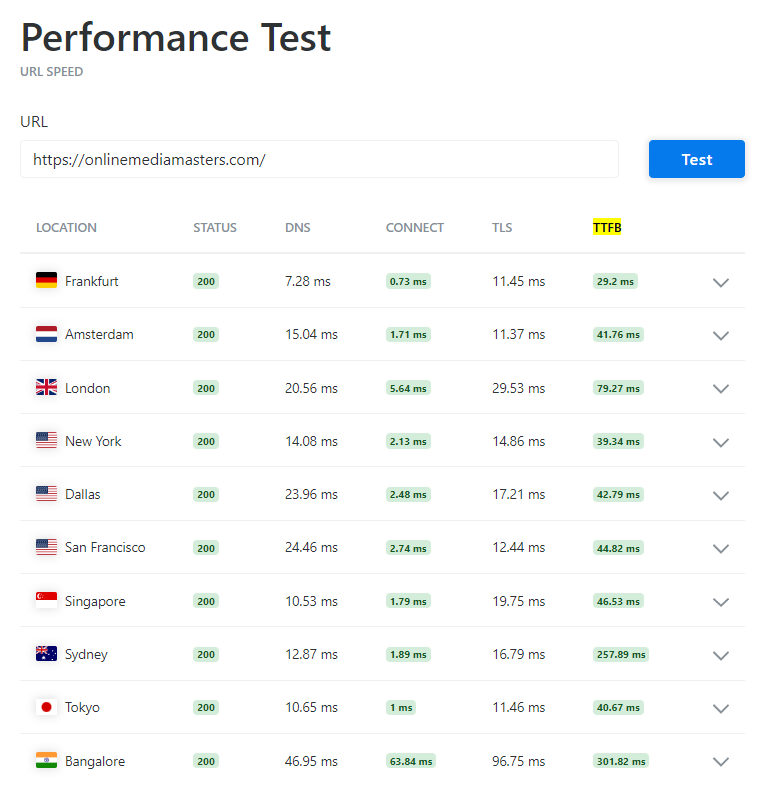
KeyCDN Performance Test (Or SpeedVitals) – SpeedVitals recommends testing your site 3 times to make sure files are cached and being served from the CDN’s closest data center. Avoid using tools like PageSpeed Insights or GTmetrix to test TTFB since they only measure 1 location. And with Cloudflare Enterprise, choosing a data center close to your users is basically irrelevant.
WordPress Hosting Benchmark Plugin – generates a “server score” based on hosting tests.
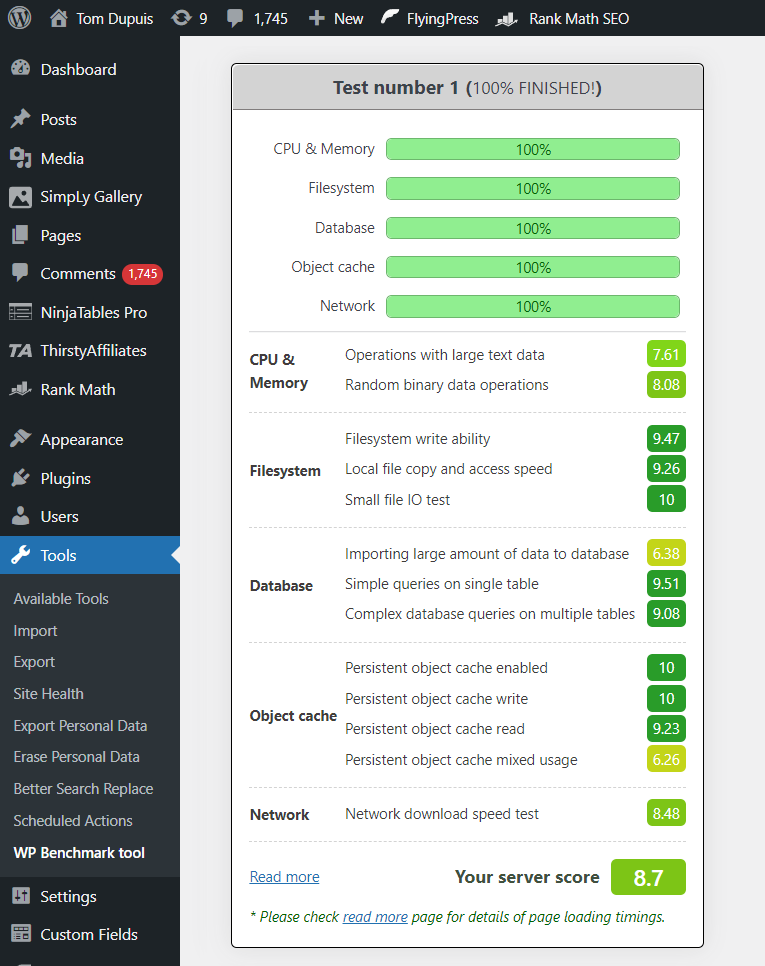
Core Web Vitals – I like the Search Console’s core web vitals report since PSI can take up to 28 days to update. Search Console also tells me if URLs stop passing before this is reflected in PSI.

Hope this helped! If you have other “setups” you’d like to see (or have questions), I’m all ears.
Cheers,
Tom


Thank you – this is an article that I’ve been eagerly awaiting! I’m going to need to set aside some time to see how my current Rocket/Flyingpress/Perfmatters setting could be tweaked (I have a Woocommerce store so may need some differences to you) but I had a couple of questions about the admin URL change option in Perfmatters:
1. You mention “If you use QUIC…” but how would I know if I am using QUIC or not?
2. Not a huge issue, but if the Admin login page is moved, wouldn’t the WP admin link from the Rocket.net dashboard stop working? Or is it clever enough to find the new login page?
Hey Gareth,
I’m not sure why that’s there and I really don’t know how this got published without me finishing the article. Looks like most things are here but I’ll need to finish this.
1. Ignore the comment about QUIC.
2. You can move the wp-login page and still access it through Rocket.net’s dashboard.
Also, you may have seen FlyingPress released bloat removal settings. Which basically means you only need Perfmatters if you need their script manager. You could also use a free plugin like Asset CleanUp for this if you don’t want to pay for Perfmatters just for the script manager.
Brilliant, thank you!
Hey tom, pretty much asked you this in an email lol!! Thank you for answering, this is literally just what I was looking for!! Thank you so much, there were a few settings there I didn’t know if it was better to tick inside Perfmatters of FlyingPress :)
Would love to see more guides on Woocommerce if you have the time, lots of clients selling online lately and the thing is so dang bloated you can only do so much to make it work lol! But Rocket with these combos makes it UNREAL!!